
VESA Mounts Explained: Sizes, Patterns & Compatibility (2026)
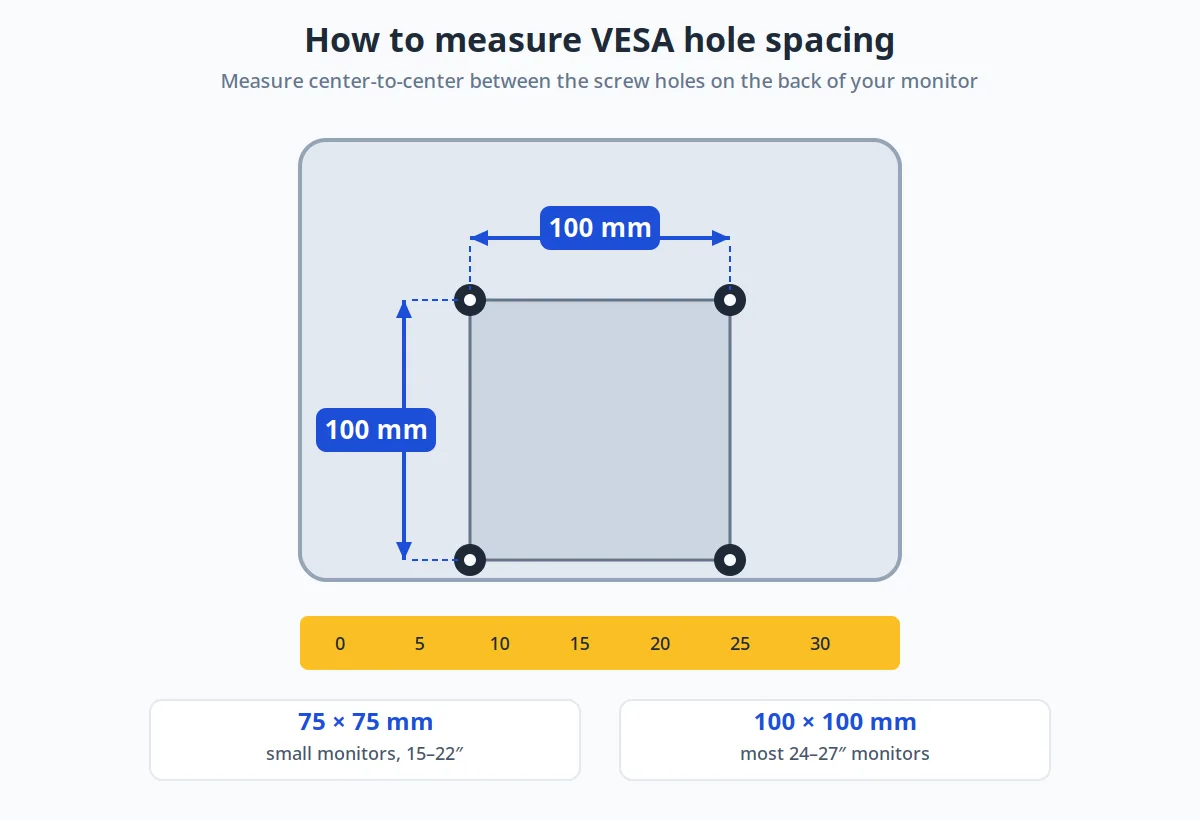
VESA is the standard hole pattern on the back of your monitor that lets it attach to arms, stands, and wall mounts. Most monitors use 75×75 mm or 100×100 mm; larger displays use 200×100, 200×200, or 400×400 mm. To check yours, look at the back of your monitor for four threaded holes in a square — measure the distance between hole centers, and match it to a VESA-compatible arm rated for your monitor’s weight.
That 30-second check is the whole compatibility question. Everything below is detail: the full pattern table, how to verify your monitor and your arm, and what to do when your monitor has no holes at all.
The Quick Answer: The 4 VESA Patterns You Need to Know
75×75 mm and 100×100 mm — the two patterns behind roughly 90% of desktop monitors, typically up to 27 inches. If your monitor is a standard office or gaming display, it’s almost certainly one of these.
200×100 mm and 200×200 mm — larger monitors and some ultrawides, roughly 30–38 inches. Less common, but most dual-purpose arms include adapter plates for them.
400×400 mm and up — TVs and very large displays (43″+). This is TV-wall-mount territory; desktop monitor arms rarely go this large.
How to check in 30 seconds: turn your monitor around (or tilt it), look for four threaded screw holes arranged in a square on the back panel, and measure center-to-center horizontally and vertically. 75 mm ≈ 3 inches; 100 mm ≈ 4 inches. That measurement is your VESA pattern.
What Is VESA, Exactly?
VESA stands for the Video Electronics Standards Association — the industry body that defined the Flat Display Mounting Interface (FDMI), universally called the VESA mount. Before the standard, every monitor needed a proprietary stand; after it, any VESA-compatible arm fits any VESA-patterned monitor, regardless of brand.
The pattern is always expressed as horizontal × vertical distance in millimeters between the mounting holes: 100×100 means the four holes form a 100 mm square. Screws are typically M4 (4 mm diameter) for the 75 and 100 patterns, stepping up to M6 or M8 for the larger ones. Length varies by monitor — the arm or mount you buy includes a set of screws, and using the included ones (not random longer screws from a drawer) matters, because a screw that’s too long can damage the panel.
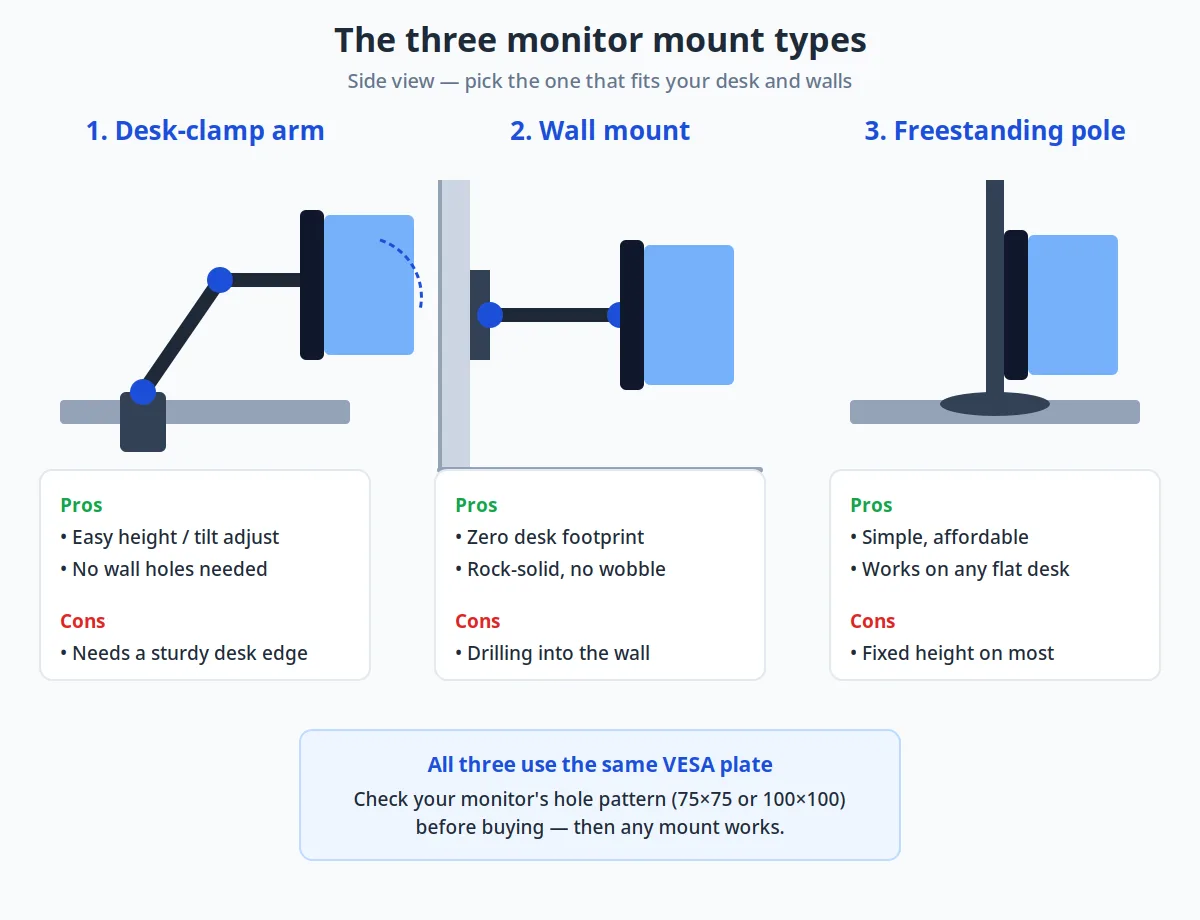
One more thing the name sometimes confuses: “VESA mount” describes the interface, not a product type. A desk arm, a wall mount, and a freestanding pole stand can all be “VESA mounts” — they just share the same hole pattern.
The Complete VESA Pattern Table
Every combination you’re likely to encounter:
| VESA pattern | Typical monitor size | Typical max weight | Screw size | Common on |
|---|---|---|---|---|
| 75×75 mm | Up to 24″ | ~8 kg (18 lbs) | M4 | Compact office monitors, portable displays |
| 100×100 mm | Up to 27–32″ | ~14 kg (31 lbs) | M4 | Most desktop monitors — the default pattern |
| 200×100 mm | 29–38″ ultrawide | ~15 kg (33 lbs) | M4/M6 | Ultrawides, some large 16:9 displays |
| 200×200 mm | 32–43″ | ~25 kg (55 lbs) | M6 | Large 4K monitors, small TVs |
| 400×400 mm | 43″+ | ~40 kg (88 lbs) | M6/M8 | TVs and very large displays |
The weights above are typical arm/mount ratings for each pattern class as of 2026 — always check your specific arm’s rated capacity, since a heavy 34-inch ultrawide on a 100×100 pattern can exceed a light-duty arm’s limit even though the holes line up.
How to Check Your Monitor’s VESA Pattern in 30 Seconds
Step 1 — Look at the back. Four threaded holes in a square or rectangle, usually near the center, often with the original stand attached through them. No holes? Skip to the non-VESA section below.
Step 2 — Measure center to center. A ruler or tape measure across two adjacent holes: ~75 mm (3″) or ~100 mm (4″) covers the vast majority of monitors.
Step 3 — Confirm in the manual or spec page. Search “your monitor model VESA” (e.g., “Dell U2723QE VESA”) — the manufacturer’s spec page lists the pattern explicitly (e.g., “VESA 100×100”). This takes another 30 seconds and removes all doubt, especially for ultrawides where 200×100 vs 100×100 matters.
Step 4 — Note the weight. Your monitor’s spec page also lists its weight without the stand — that’s the number your arm must support. (Stands add 1–3 kg, so don’t use the shipping weight.)
That’s it. Pattern + weight are the only two numbers the arm cares about.
What to Check on the Arm Side
Matching holes is necessary but not sufficient. Before buying an arm, verify four things:
1. Weight rating. The arm’s maximum load must exceed your monitor’s weight with margin. A 9 kg monitor on an arm rated for 9 kg will technically hold — and will sag, drift, and annoy you daily. Aim for at least 20–30% headroom. This is the single most common compatibility mistake.
2. VESA plate compatibility. Most arms ship with 75×75 and 100×100 plates; many include 200×100 adapters. If your monitor is 200×200, confirm the arm explicitly lists it — don’t assume.
3. Size range, not just pattern. An arm rated for “up to 32 inches” may physically struggle with a 34-inch ultrawide even at the right pattern and weight, because ultrawides are wide and leverage matters. Check the arm’s stated screen-size range against your actual diagonal.
4. Desk compatibility. Gas-spring and mechanical arms clamp to your desk — verify your desk’s thickness fits the clamp range (usually 10–80 mm) and that the edge isn’t beveled or glass without reinforcement. Grommet mounts need an actual hole. This is the question our readers ask most after pattern fit: our monitor stand vs. monitor arm guide covers mount types in depth.
Once pattern, weight, size, and desk all check out, you’re compatible. For picking the arm itself, see our best dual monitor arm rankings.
What If Your Monitor Has No VESA Holes?
Some monitors — certain Dell, HP, and Samsung models, plus most Apple displays with factory stands — skip VESA holes or hide them behind a proprietary mount. You still have options:
Adapter brackets. Third-party VESA adapters clamp onto the monitor’s existing mount point or frame and provide a standard 75×75 or 100×100 plate. They’re model-specific, so search “your monitor model VESA adapter” — they typically cost $15–$40 as of 2026.
Check for a hidden pattern. Some monitors (notably certain LG and ASUS models) have VESA holes concealed behind a snap-off cover or the factory stand’s neck. Remove the stand per the manual before concluding there are no holes.
Replacement backs. A few monitor lines offer an official VESA-compatible back panel swap. Rare, but worth one search before buying an adapter.
When to give up: if no adapter exists for your model and the monitor is old or low-value, the pragmatic move is often a monitor stand that holds the monitor by its base instead of fighting the mount.
Desk Mount vs. Wall Mount vs. Freestanding: Which Mount Type?
The pattern is the same; the furniture differs.
Desk clamp/grommet arms are the default for home offices: no drilling (clamp) or one small hole (grommet), full adjustability, and they free the desk surface underneath. Best when you rent or rearrange often.
Wall mounts are the cleanest look and the most stable — zero desk footprint, zero wobble. The cost is commitment: drilling into studs, fixed position, and landlord negotiations. Best for permanent setups.
Freestanding pole stands sit on the desk like a traditional stand but hold one or more monitors on VESA plates. No clamping, no drilling, but they consume desk depth. Best for glass desks or desks with edges that can’t take a clamp.
All three use the same VESA interface, so your pattern homework transfers directly. The detailed trade-offs — including which desks suit which mount — are in our monitor stand vs. monitor arm comparison, and our dual monitor ergonomics guide covers positioning once mounted.
Frequently Asked Questions
Will a VESA mount fit my curved or ultrawide monitor?
Usually yes, with two caveats. First, check the pattern — many 34-inch ultrawides use 100×100, but some use 200×100, so verify rather than assume. Second, respect the arm’s weight and size ratings: ultrawides are heavy for their diagonal (often 7–10 kg) and their width creates leverage that stresses the tilt joint. Choose an arm explicitly rated for ultrawides, with at least 20% weight headroom.
My old monitor has no mounting holes. Am I stuck with the factory stand?
Not necessarily. Search for a model-specific VESA adapter bracket ($15–$40) — they exist for most popular non-VESA monitors from Dell, HP, and Samsung. Also check whether the holes are hidden behind a snap-off cover or the stand neck before assuming they’re absent. If no adapter exists, a freestanding VESA pole stand that grips the desk (not the monitor) is the fallback.
Will my monitor arm hold a 34-inch ultrawide?
It can, if three numbers line up: the VESA pattern matches (usually 100×100, sometimes 200×100), the monitor’s weight is comfortably under the arm’s rating, and the arm’s stated screen-size range includes 34 inches. When in doubt, size up the arm — an arm rated for 38-inch displays holding your 34-inch ultrawide will feel rock-solid, while a maxed-out arm will sag.
Do I need tools to attach a VESA mount?
Basic ones: the arm ships with the screws and usually an Allen key, but you’ll want your own Phillips screwdriver and, for the desk clamp, no tools at all on most designs. Wall mounts need a drill, a stud finder, and a level — don’t skip the stud finder.
Is 75×75 becoming obsolete?
No. It’s still the standard for compact monitors and portable displays, and every mainstream arm supports it alongside 100×100. If anything, the trend is more standardization, not less — even most ultrawides now stick to 100×100 or 200×100 rather than inventing new patterns.
The Bottom Line
VESA compatibility is two numbers: your monitor’s hole pattern (probably 75×75 or 100×100 — measure in 30 seconds) and its weight without the stand. Match those against an arm’s plate compatibility and weight rating with margin, confirm your desk suits the mount type, and you’re done. Do the homework once, and every future monitor upgrade becomes a five-minute swap instead of a research project. Ready to shop? Start with our best dual monitor arm picks, or compare stands vs. arms if you’re still deciding on the mount type.