How Should Your Keyboard and Mouse Be Positioned? The Definitive Ergonomic Guide
Your keyboard and mouse are the two things you touch most during the workday — thousands of keystrokes and clicks, every day, for years. Get their position wrong and the bill arrives as wrist aches, shoulder tension, and that vague end-of-day soreness you can’t quite place. Get it right and you simply… never think about it. That’s the goal.
This guide gives you exact numbers — heights, angles, distances — for setting up your keyboard and mouse whether you sit, stand, or work from a laptop on the couch. No vague “sit up straight” advice; just measurements you can apply today.
Your keyboard should sit about a fist’s width — roughly 4 to 6 inches — from the front edge of the desk. This keeps your wrists straight and floating while you type instead of bending upward to reach the keys. (Source: Mayo Clinic) If you find yourself stretching, pull the keyboard closer or lower your chair until your elbows rest near 90 degrees.
The 60-Second Setup Checklist
If you only have a minute, do this:
- Chair height: Adjust so your feet rest flat on the floor with thighs roughly parallel to it.
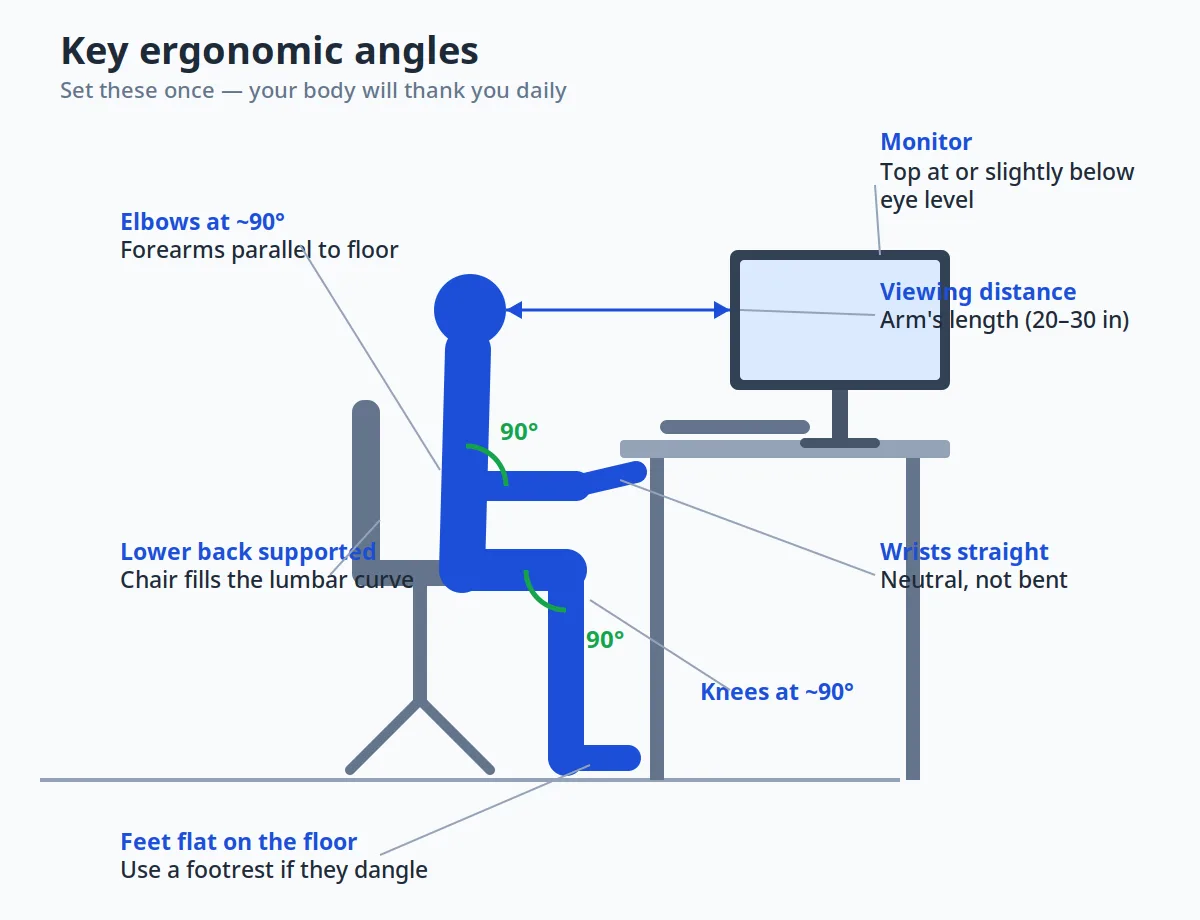
- Keyboard height: Elbows bent at about 90 degrees, forearms roughly parallel to the floor — the keyboard’s home row should sit at or just below elbow height.
- Keyboard distance: About a fist’s width (4–6 inches) between the desk edge and the keyboard, so your wrists aren’t bent upward reaching for it.
- Keyboard tilt: Keep it flat or tilted slightly away from you (negative tilt). Skip the flip-out feet that tilt it toward you.
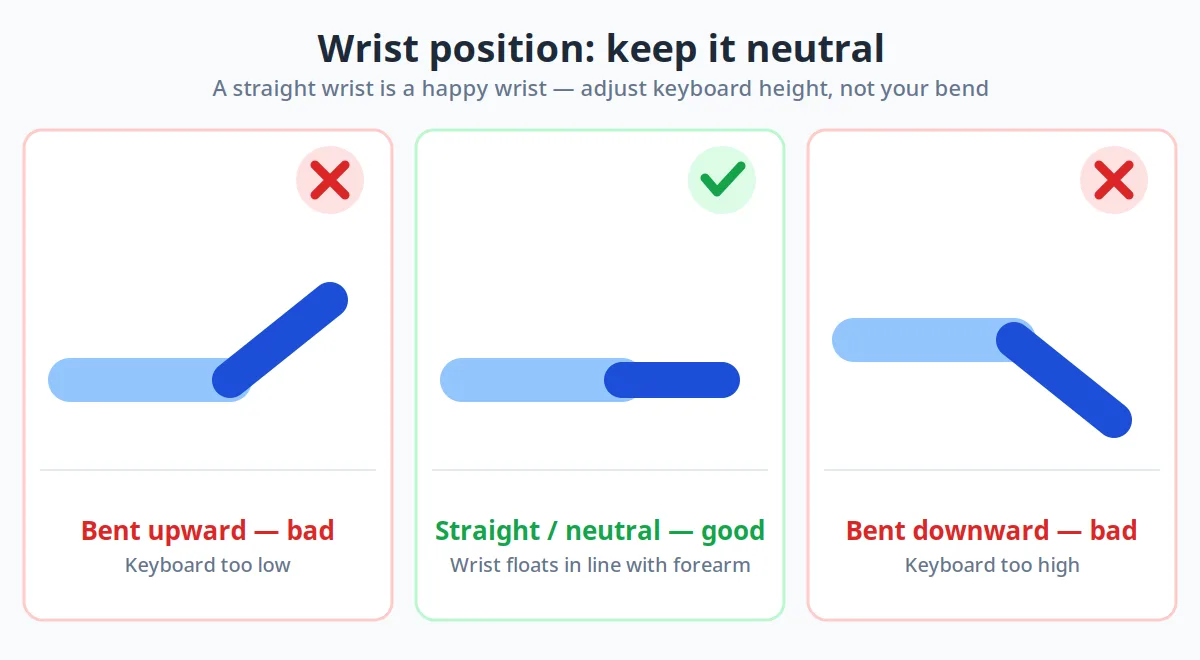
- Wrists: Straight and floating — not resting on the desk edge while typing, not bent up or down.
- Mouse: Right beside the keyboard at the same height, close enough that your upper arm hangs relaxed at your side.
- Monitor: Top of the screen at or just below eye level, about an arm’s length away — because craning your neck ruins even perfect hand positioning.
That’s 80% of it. The rest of this guide explains the why behind each rule and how to handle the tricky cases.
Keyboard Position: The Rules
Height — Elbows at 90 Degrees
The master rule of keyboard ergonomics: your elbows should hang naturally at roughly a 90-degree angle (anywhere from 90 to 110 degrees is fine), with forearms roughly parallel to the floor or sloping very slightly downward toward the keyboard.
In practice, this means the keyboard’s home row sits at about elbow height or up to an inch below it. For most adults at a standard 29–30 inch desk, that’s too high — which is exactly why so many people type with shrugged shoulders. If your shoulders creep toward your ears while typing, your keyboard is too high relative to your chair.
The fix hierarchy, from best to simplest:
- Lower the keyboard, not the chair. An under-desk keyboard tray ($30–$80) drops the keyboard 2–4 inches below desk height — the single most effective ergonomic upgrade for standard desks.
- Raise the chair and add a footrest. If a tray isn’t an option, raise your seat until elbows hit 90 degrees, then support your feet so they don’t dangle.
- Lower an adjustable desk. If you have a standing desk, just lower it until your elbows are right. This is one of the underrated perks of height adjustability.
Distance — Close, But Not Crowded
Push the keyboard back so there’s roughly 4–6 inches between the desk edge and the keyboard. Too close to the edge and your wrists bend upward (extension) to reach the keys; too far and you lean forward, dragging your shoulders with you.
Compact keyboards earn their keep here: a tenkeyless (TKL) or 75% layout pulls the mouse several inches closer to your body’s centerline, which measurably reduces shoulder strain for mouse-heavy work. Our quiet mechanical keyboard guide covers compact options that are also office-friendly.
Tilt — Flat Beats “Ergonomic” Feet
Those little flip-out feet under most keyboards? Ergonomists generally recommend leaving them folded flat. Tilting the keyboard toward you bends your wrists upward into extension — the exact posture that compresses the carpal tunnel area.
What actually helps is negative tilt: the keyboard sloping gently away from you, so your wrists stay straight or angled slightly downward. Keyboard trays often include negative-tilt adjustment; some stands and risers do too. If your wrists currently bend upward while typing, flattening the keyboard is a free fix worth trying today.
Split, Tented, and Curved Keyboards
If your shoulders feel pinched even with good height and distance, the issue may be width: a standard keyboard forces your arms slightly inward. Split keyboards let each half sit at shoulder width; tented designs raise the middle so your forearms rotate into a more natural handshake position.
You don’t need to go full custom-keyboard hobbyist. Even a modestly split or curved mainstream board can help — and if you’re shopping, our mechanical vs. membrane comparison breaks down what actually matters for office typing.
Mouse Position: Keep It Close
The Shoulder Rule
Your mouse should sit directly beside the keyboard, at the same height, close enough that your upper arm hangs relaxed and your elbow stays near your torso. The classic mistake is reaching: mouse pushed far to the side or too far forward, forcing the shoulder into a permanent mini-stretch. Hours of that = the achy shoulder nobody can explain.
If you use a full-size keyboard with a number pad, consider that the pad alone pushes your mouse 4+ inches off-center. Switching to a tenkeyless layout is the cheapest shoulder fix in ergonomics.
Height and Angle Match the Keyboard
Everything said about keyboard height applies to the mouse: same surface, same elbow angle. If you use a keyboard tray, the mouse goes on it too — never leave the mouse up on the desk while the keyboard sits lower. That height mismatch is a wrist-bender.
Size and Grip Matter More Than DPI
A mouse that’s too small forces a claw grip; too large and your fingers overextend. Your hand should drape over it with fingers resting naturally on the buttons — no stretching, no scrunching. Palm, claw, and fingertip grips are all fine; the wrong size for your grip is what’s not fine.
This is also where shape innovation helps: many people with wrist discomfort do well with an ergonomic or vertical mouse that keeps the forearm in a neutral handshake orientation instead of twisted flat. Our best ergonomic mice for office work guide compares the top options.
Sensitivity: Stop Reaching
Crank your pointer speed up a notch. Higher sensitivity means smaller hand movements cover the same screen distance — less travel, less strain. It feels twitchy for a day, then your brain adapts and your shoulder thanks you.
The Chair–Desk Relationship
Keyboard and mouse positioning doesn’t exist in isolation — it’s the output of a chair-desk-monitor system. Get the foundation wrong and no peripheral placement saves you.
Set Chair Height First
Sit with your feet flat on the floor (or a footrest), thighs roughly parallel to the floor, and a fist-sized gap between the seat edge and the back of your knees. This is your anchor — everything else adjusts around it.
Then Set Keyboard/Mouse Height
With the chair fixed, bring the keyboard and mouse to elbow height using the methods above (tray, desk adjustment, or chair-plus-footrest). Resist the temptation to do it backwards — lowering your chair to meet a too-high desk just recreates the problem at your hips and knees.
Monitor Height Completes the Picture
Top of the screen at or slightly below eye level, roughly an arm’s length away. A monitor that’s too low drags your whole upper body forward and down, collapsing the posture your keyboard setup just fixed. A monitor arm or simple riser solves it in minutes — see our dual monitor ergonomics guide for multi-screen setups.
For the full head-to-toe sequence, our home office ergonomics checklist walks through the entire workstation in order.
The Laptop Problem (and How to Fix It)
Laptops violate every rule simultaneously: the screen is too low and the keyboard is too high, permanently. You cannot fix both at once on the laptop itself — it’s a design tradeoff, not a personal failing.
The fix is to separate the screen from the keyboard:
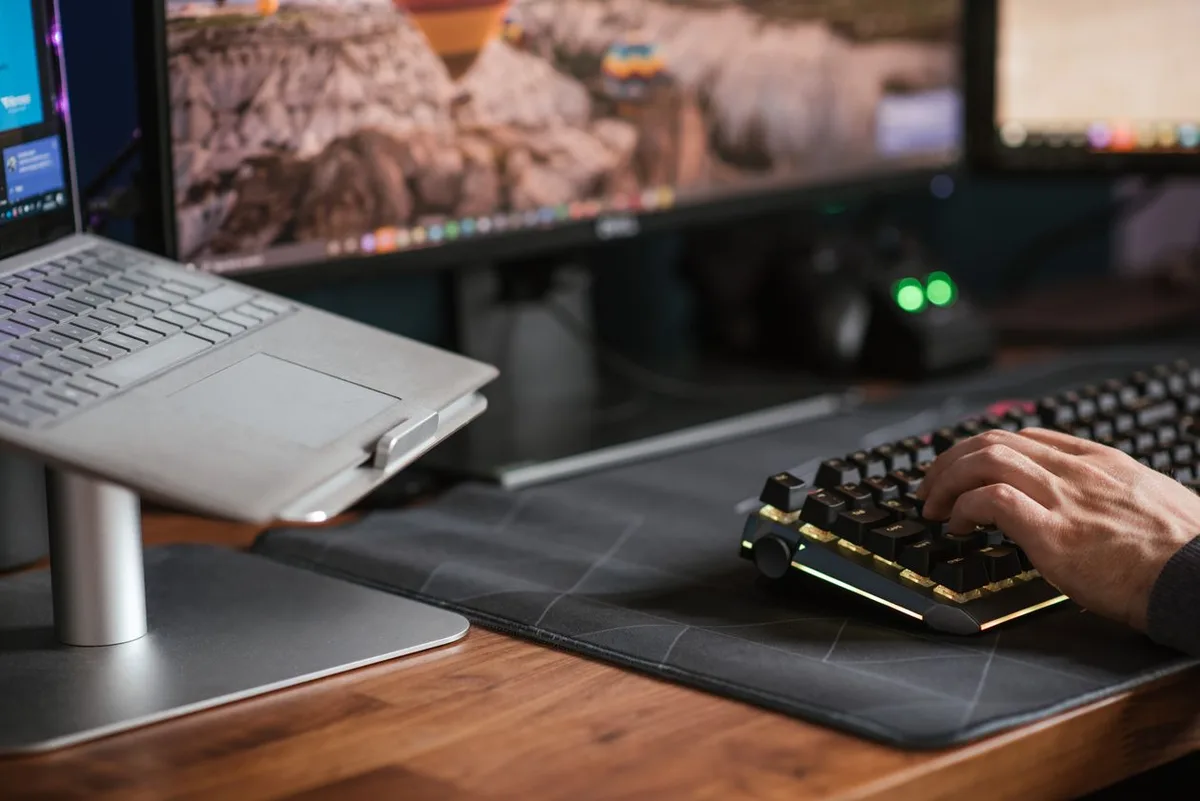
- Best: Laptop on a stand or riser (screen at eye level) + external keyboard and mouse at elbow height. This converts a laptop into a proper workstation.
- Good: Laptop on a stand + external keyboard; use the laptop’s trackpad if you must, but a real mouse is better.
- Minimum viable: At least raise the laptop on a stack of books for calls and reading, and plug in an external keyboard for long typing sessions.
If you work from a laptop more than a couple of hours a day, an external keyboard and mouse plus a $25 stand is the best money in ergonomics. Full stop.
7 Positioning Mistakes Everyone Makes
| Mistake | Why It Hurts | The Fix |
|---|---|---|
| Keyboard on flip-out feet, tilted toward you | Bends wrists upward into extension | Fold the feet flat; try slight negative tilt |
| Mouse far from the keyboard | Shoulder held in constant reach | Move mouse beside keyboard; consider TKL layout |
| Resting wrists on desk edge while typing | Compresses the underside of the wrist | Float wrists while typing; rest palms only during pauses |
| Chair too low, shoulders shrugged | Neck and shoulder tension within an hour | Raise chair + footrest, or add a keyboard tray |
| Laptop flat on desk all day | Neck craned down, wrists bent up | Laptop stand + external keyboard and mouse |
| Monitor too low | Whole upper body collapses forward | Raise to eye level with an arm or riser |
| Death-gripping the mouse | Finger and forearm fatigue | Relax grip; raise pointer speed to reduce movement |
Note on wrist rests: the padded bars sold as “wrist rests” are really palm rests — use them only during pauses, with the heel of your palm, never while actively typing. Pressing your wrists into them mid-keystroke does more harm than good.
Accessories Worth Buying (and What’s Optional)
- Under-desk keyboard tray — the biggest single upgrade for standard-height desks. Look for height and tilt adjustment.
- Compact keyboard (TKL/75%) — brings the mouse closer to center; also just nicer to type on. See quiet mechanical keyboards.
- Ergonomic or vertical mouse — worth trying if your wrist or forearm complains. Compare options in best ergonomic mice.
- Laptop stand — non-negotiable for regular laptop work.
- Footrest — needed whenever raising the chair leaves feet dangling.
- Wireless keyboard + mouse combo — one purchase that upgrades both input devices at once and cuts cable clutter. See best wireless keyboard and mouse combos.
Skip for now: expensive “ergonomic” keyboards with aggressive sculpting (try positioning fixes first), elbow pads, and posture-correcting gadgets. Master the free adjustments; buy gear to solve what’s left.
We round up the best wrist rests in our guide.
Frequently Asked Questions
Should my keyboard be flat or tilted?
Flat, or tilted slightly away from you (negative tilt). The flip-out feet that tilt the back edge up bend your wrists into extension, which most ergonomists recommend avoiding. If you want an angle, negative tilt — front edge higher than the back — keeps wrists straighter.
How far should my mouse be from my keyboard?
Directly beside it, at the same height, with your upper arm relaxed at your side. If you have to reach outward or forward to grab the mouse, it’s too far. A tenkeyless keyboard shortens the reach significantly.
Is it bad to rest my wrists on the desk while typing?
While actively typing, yes — it bends the wrists and presses soft tissue against a hard edge. The better habit is floating your hands while typing and resting the heels of your palms on a pad only during pauses.
What’s the correct elbow angle for typing?
Roughly 90 to 110 degrees, with forearms about parallel to the floor. If your elbows are much tighter (keyboard too high) or much wider (keyboard too low), adjust chair, tray, or desk height until the angle feels neutral and shoulders stay down.
How do I set up ergonomics with a laptop?
Raise the laptop screen to eye level with a stand, then use an external keyboard and mouse at elbow height. This is the only arrangement that fixes both the too-low screen and too-high keyboard at once. For long sessions it’s essential, not optional.
Do vertical mice actually help?
Many people find them more comfortable because they keep the forearm in a neutral “handshake” position rather than twisted palm-down. They’re not magic — positioning fundamentals still apply — but if your wrist aches with a standard mouse, a vertical or ergonomic model is worth trying. See our ergonomic mouse picks.
Your hands are only part of the picture — run through the full ergonomics checklist and make sure your chair isn’t undoing your good work.