
Cable Management for Standing Desks: Stop the Snags, Stretching & Unplugging
A standing desk introduces a problem no static desk has: everything moves. Raise the desk and your monitor cable goes taut, your power strip lifts off the floor, and that USB dock cable you forgot about gets yanked out mid-call. Lower it and the slack pools into a tangled nest. Do this twice a day for a year and something will break — usually at the worst moment.
Cable management for a standing desk isn’t about hiding wires. It’s about building a system that flexes safely through the full height range without pulling, pinching, or unplugging anything. This guide shows you exactly how.
Why Standing Desks Destroy Normal Cable Management
On a fixed desk, you can zip-tie everything into place and forget it. On a standing desk, that same approach fails in predictable ways:
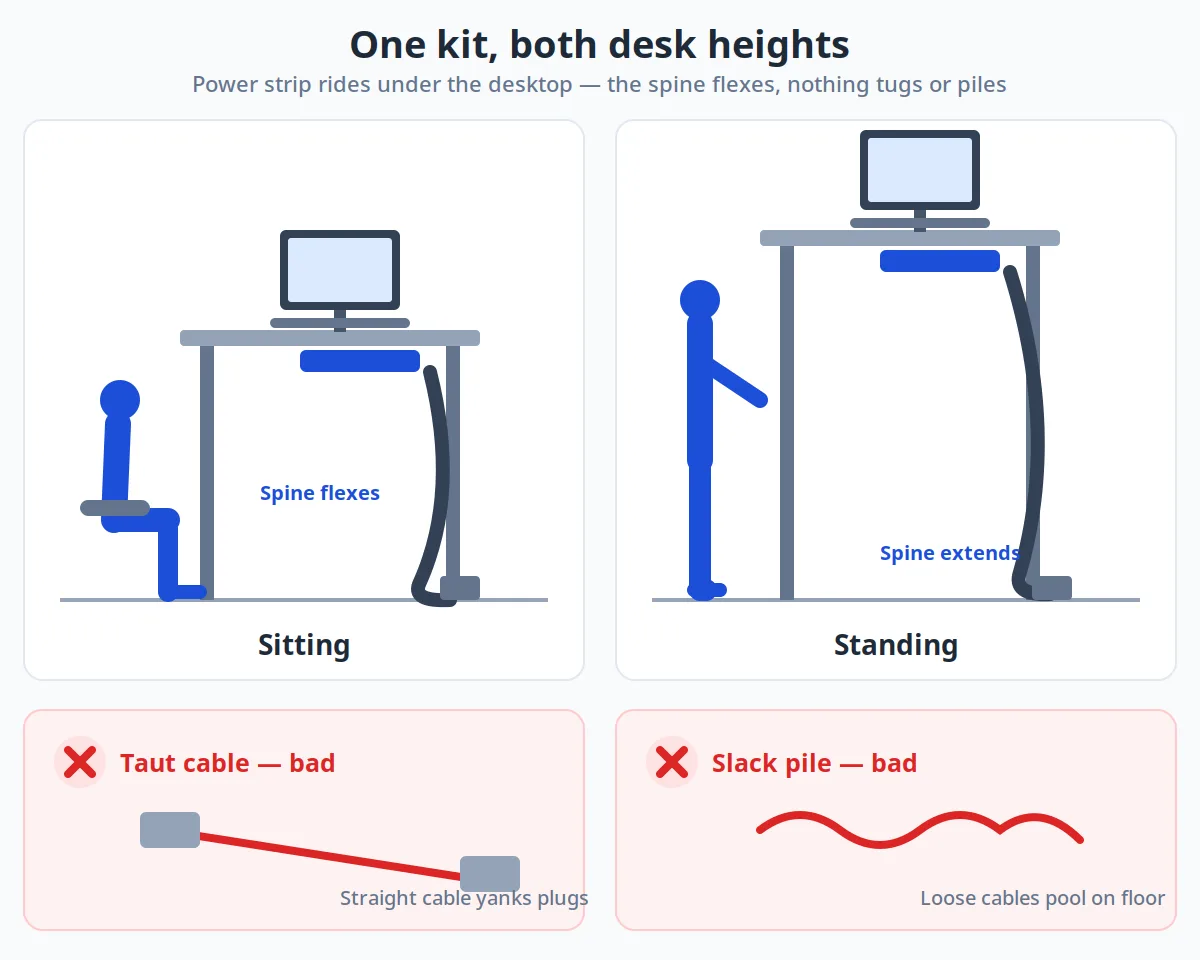
- Cables go taut at standing height. A cable that’s neatly routed at sitting height becomes a tripwire at full extension — pulling on ports, stressing connectors, or unplugging devices.
- Slack piles up at sitting height. The extra length you need for standing has to go somewhere when the desk drops. Unmanaged, it drapes onto the floor, catches on chair wheels, and collects dust.
- The power strip wants to stay on the floor. Most people plug into a wall outlet or floor strip — but the desk moves away from it twice a day. Something has to bridge that moving gap.
- Pinch points eat cables. Lifting columns, crossbars, and frame joints can trap a cable during travel. A pinched cable doesn’t just look bad — repeated pinching damages insulation.
The fix isn’t more zip ties. It’s a different architecture: everything on the desk rides with the desk, and exactly one flexible connection bridges the gap to the wall.
The Golden Rule: Everything Rides With the Desk
Here’s the principle that makes it all work:
Mount the power strip under the desktop. Route every device cable to it. Then run ONE flexible cable chain from the desk down to the wall outlet.
When the desk rises, the strip, the dock, the monitor cables — all of it — travel together as one unit. The only thing that flexes is the single vertical run to the wall, and you design that run to flex gracefully.
This is the opposite of the beginner approach (strip on the floor, cables dangling from the moving desktop down to it). Floor strips with standing desks are the number-one cause of yanked cables.
If you’re starting from zero on cable hiding, read our no-drill cable hiding guide first — it covers trays, clips, and sleeves that need no screws, which matters because many standing-desk owners are renters. Then come back here for the moving-desk specifics.
Your Moving-Desk Cable Kit
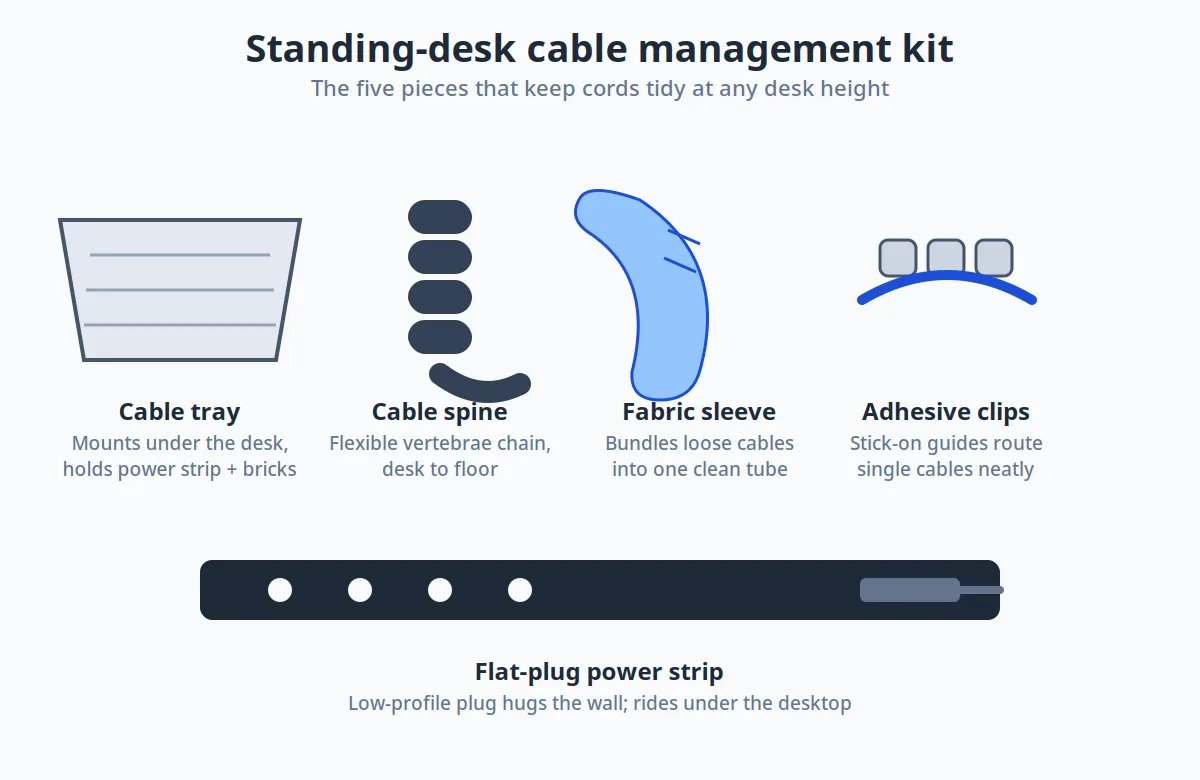
You don’t need much — but you need the right pieces:
| Item | What It Does | Why It Matters for Standing Desks | Typical Cost |
|---|---|---|---|
| Under-desk cable tray | Holds the power strip and slack under the desktop | The strip rides with the desk — the foundation of the whole system | $20–$40 |
| Cable spine / vertebrae chain | Segmented flexible channel from desk to floor | Guides the wall run through smooth flexing instead of dangling | $25–$45 |
| Fabric cable sleeve | Bundles the desk-to-wall run into one clean column | Cheaper spine alternative; flexes naturally | $10–$15 |
| Adhesive cable clips | Pins cables along the desktop underside | Keeps runs tidy and away from lifting columns | $8–$12 |
| Surge-protecting power strip (flat plug) | Central power hub mounted under the desk | Flat plug fits behind furniture; surge protection guards your gear | $25–$40 |
| Longer cables | Replacements sized for full standing height + slack | The most-skipped step — stock cables are sized for sitting | $10–$25 |
Total realistic budget: $60–$120 for a complete, clean, movement-safe setup. Compare that to replacing one yanked monitor cable mid-deadline — or one fried dock.
Step-by-Step: Routing Cables on a Standing Desk
Step 1: Mount the Power Strip Under the Desktop
This is the foundation. Attach a surge-protecting power strip to the underside of the desktop, toward the back edge — adhesive-mounted or clamp-on trays both work (see the no-drill methods for details). Everything on your desk plugs in here, not at the wall.
Keep the strip’s own power cord — the one that will run to the wall — as the designated “traveler” cable. Every other cable terminates at the desk.
Step 2: Replace Short Cables Before You Route Anything
Measure at full standing height, then add 6–8 inches of slack. The usual victims:
- Monitor power and video cables (DisplayPort/HDMI)
- USB-C dock or hub cable
- Any cable running to a PC tower on the floor — consider moving the tower onto the desk or into an under-desk CPU holder so it rides along
This is the step everyone skips and everyone regrets. A cable that’s perfect at sitting height is a unplugging waiting to happen at 48 inches.
Step 3: Route Device Cables Along the Underside
Run each cable from its device back to the under-desk strip, pinning runs with adhesive clips every 12–18 inches. Keep cables away from the lifting columns and any crossbar — route along the back edge instead. Coil excess into loose loops in the tray, never tight wraps that strain connectors.
If you use a monitor arm, take advantage of its built-in cable clips — arm-routed cables move cleanly with the screen and stay off the desktop entirely.
Step 4: Build the Vertical Drop
Now the critical part: the single run from the desk down to the wall outlet. You have three good options:
Option A — Cable spine (best). Segmented vertebrae-style chains (the kind you see on office desks) bolt or clamp to the desktop underside and stand on the floor. The segments articulate as the desk moves, keeping the cable inside a smooth curve. Most elegant, most expensive, most durable.
Option B — Fabric sleeve (best value). A zippered fabric sleeve bundling the power cord plus any stragglers into one flexible column. It won’t self-support like a spine, so anchor the top to the desk and let it hang — the fabric flexes naturally through the height range. Our desk cable management ideas guide shows sleeve techniques in detail.
Option C — Retractable cable reel. For minimalists: a single retractable extension cord mounted under the desk pays out cable as the desk rises and retracts it as it lowers. Clean, but verify the reel’s rating matches your total load.
Whichever you choose: the vertical run should have enough slack for full standing height plus a few inches, and it should hang or articulate behind a desk leg, not in open space where chairs and feet live.
Step 5: Test the Full Travel — Twice
Raise the desk to maximum height. Check every cable: anything taut? Any connector under tension? Lower to minimum: anything dragging on the floor or caught on the frame? Run the full cycle twice and watch the lifting columns — then fix what you find before it becomes a 9 AM surprise.
6 Mistakes That Unplug Your Setup
- Leaving the power strip on the floor. The classic error. Every device cable becomes a bungee cord. Mount the strip under the desktop.
- Sizing cables for sitting height. Measure at max height plus slack, or don’t bother.
- Routing across lifting columns. Columns move and have pinch points. Route along the back edge, never across a leg.
- Forgetting the PC tower. A floor tower connected to a moving desk is a cable-yanking machine. Move it onto the desk or into a mounted holder.
- Over-tight zip ties. On a moving desk, cables need to slide and flex. Tight zip ties concentrate stress at one point — use hook-and-loop straps instead.
- Skipping the travel test. The two minutes of running the desk up and down while watching cables saves you from discovering problems during a video call.
Renting or Can’t Drill? Start Here
Good news: almost everything in this guide is achievable without a single screw. Adhesive-mounted trays, clamp-on spines, fabric sleeves, and stick-on clips cover the full system — which is exactly why we wrote the companion guide: How to Hide Cables Under Your Desk Without Drilling. It walks through five no-drill methods in detail, including which adhesives actually hold a loaded power strip.
One caution specific to standing desks: adhesive mounts cure best when undisturbed for 24–72 hours. Apply them, then don’t cycle the desk for a couple of days while the bond sets. Heat from a loaded power strip can soften fresh adhesive, so give it time.
Frequently Asked Questions
How do I keep cables from unplugging when my standing desk moves?
Mount a power strip under the desktop so every device cable terminates at the desk, then run a single flexible vertical drop (cable spine or fabric sleeve) to the wall outlet. Size all cables for full standing height plus slack, and test the full up-down travel before calling it done.
What is a cable spine for a standing desk?
A cable spine (also called a vertebrae cable manager) is a segmented chain that runs from the underside of your desk to the floor, carrying cables inside it. The segments articulate as the desk rises and lowers, so cables flex through a smooth curve instead of dangling or going taut. It’s the cleanest solution for the desk-to-wall run.
Can I use a regular power strip with a standing desk?
Yes — but mount it under the desktop, not on the floor. A floor strip turns every device cable into a tension cable when the desk rises. Use a surge-protecting strip with a flat plug, mount it toward the back edge of the underside, and run its cord down to the wall through your cable spine or sleeve.
How much slack do cables need on a standing desk?
Enough to reach comfortably at maximum desk height, plus 6–8 inches extra. Measure with the desk fully raised — cables sized for sitting height are the number-one cause of unplugged monitors and docks. Coil the extra loosely in your under-desk tray when the desk is lowered.
Where should the PC go with a standing desk?
Ideally on the desk itself or in an under-desk CPU holder that moves with it. A PC on the floor connected to a moving desk needs very long, carefully routed cables and is the most common source of yanked connections. If the tower must stay on the floor, give its cables generous slack and route them through the same spine as everything else.
Do I need to drill into my standing desk for cable management?
No. Adhesive-mounted trays, clamp-on cable spines, fabric sleeves, and stick-on clips handle the entire system without screws — important for renters and for desks under warranty. See our for the full method breakdown.
New to standing desks? Read are standing desks worth it first, then browse 19 desk cable management ideas for the general playbook.