
How to Hide Cables Under Your Desk Without Drilling (5 Methods)
Nothing ruins a good desk setup faster than a dangling nest of cables — a power strip hanging off the desk edge, monitor cords drooping like vines, and a dust-covered tangle that makes you dread unplugging anything.
Most cable management guides assume you can screw things into your desk. But if you’re renting, using a standing desk, or working on a glass desk, drilling isn’t an option. The good news: five no-drill methods can get you a genuinely clean underside without a single screw — plus solutions for a standing desk’s moving cables and the run from your desk to the wall outlet.
Plan Your Cable Routes Before You Start
The biggest mistake people make is buying accessories and sticking them on in whatever order seems right. Twenty minutes of planning saves you from re-sticking adhesive mounts (which weakens them).
- Inventory every device on your desk: monitors, laptop or PC, dock, speakers, chargers, lamp.
- Find the hub point. Almost everything plugs into one place — usually your power strip or a USB-C dock. Mount it first, under the desk, behind your workspace.
- Trace each cable’s path from device to hub. Cables along the back edge are easiest to hide; diagonal runs need rerouting or a sleeve.
- Decide what leaves the desk. Ideally only one or two cables travel down to the wall outlet; everything else terminates at the under-desk hub.
- Check the underside surface. Adhesive mounts need smooth, flat, clean surfaces — wipe with rubbing alcohol first.
Snap a photo of the underside before you start — you’ll appreciate the before-and-after shot.
Method 1: Adhesive Cable Clips and Holders
Adhesive cable clips are the simplest no-drill upgrade you can make. These small self-adhesive holders pin individual cables to the underside or back edge of your desk so they run in straight lines instead of sagging.
They’re best for thin, light cables: monitor cords, USB-C cables, headphone wires, chargers. Space clips every 12–18 inches, match the clip size to the cable, and let the adhesive cure for 24–72 hours before loading them — heat from devices can soften fresh adhesive.
Method 2: No-Drill Under-Desk Cable Tray (Adhesive-Mounted or Clamp-On)
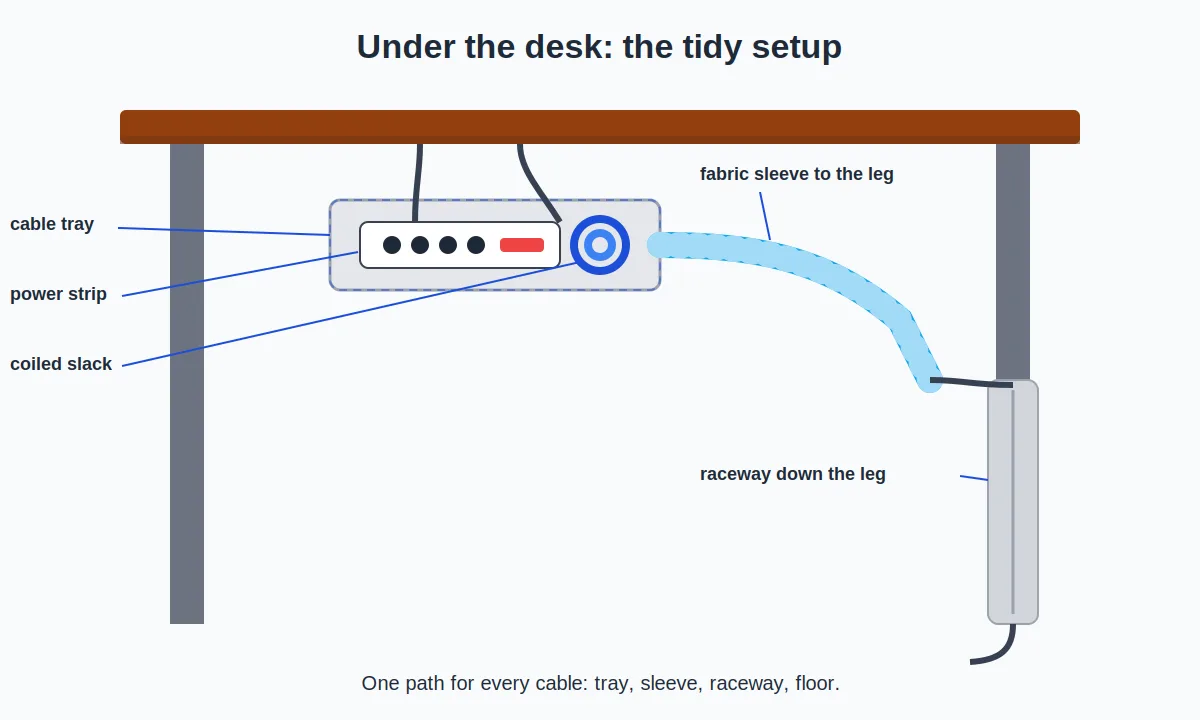
The cable tray is the workhorse of clean setups — a basket that holds your power strip, excess slack, and bulky adapters out of sight. Two no-drill versions exist: adhesive-mounted trays that stick to the underside, and clamp-on trays that grip the desk’s back edge.
This makes the biggest visual difference, because it lifts the bulkiest offenders — the strip, brick adapters, coiled cable — into the desktop’s shadow, invisible from any normal viewing angle.
Adhesive trays are invisible from the front and work on any flat underside, but they have a weight limit — fine for a power strip plus cables, risky with a heavy dock and laptop brick. Clamp-on trays hold more weight and never fail from adhesive aging, but need a back edge thick enough to grip (usually 0.5–2 inches).
Mount the tray toward the back of the desk, not the center. Back-mounted trays disappear behind the rear edge from the front, and cables drop straight back in instead of snaking across the underside. Coil excess length into loose loops — never tight wraps that strain connectors.
Method 3: Cable Sleeves and Spiral Wraps for Bundling Runs
A cable sleeve (also called a cable sock) is a flexible fabric tube that bundles several cables into one neat run; spiral wraps are the plastic-coil cousin. Either one turns five messy parallel cables into a single clean “cable spine” — the most satisfying improvement after the tray.
Sleeves shine in two places: the horizontal run from your devices to the tray, and the vertical drop from desk to floor. Fabric sleeves with a zipper or hook-and-loop closure are the most practical choice, since you can add or remove cables later. Spiral wraps are cheaper and fine for bundles you won’t change, but they’re tedious on long runs.
One caution: bundling power and data cables over a few feet is not a real problem for typical setups. Just keep a high-wattage brick (like a 200W+ gaming laptop adapter) out of sealed sleeves — give big bricks breathing room in an open tray.
Method 4: Adhesive Cable Raceways Down the Desk Leg
Raceways — slim channels often called J-channels — cover the one path clips and sleeves can’t fully hide: the vertical drop down the desk leg to the floor or wall outlet.
Adhesive raceways stick to the back or side of a desk leg with heavy-duty mounting tape. Run your desk-to-outlet cable inside, snap the cover closed, and the cable disappears against most desk frames.
Dry-fit the channel and mark the position with painter’s tape first — raceways are hard to reposition once stuck. Leave a few inches of slack at the top for maintenance, and use the leg closest to the outlet.
For desks with thin or oddly shaped legs (glass desks, some standing-desk frames), a fabric sleeve in a matching color often beats a rigid raceway — it flexes around curves a raceway can’t follow.
Method 5: Mount the Power Strip Under the Desk (Adhesive Strips or Clamp Bracket)
Everything above assumes your power strip lives under the desk — and it should. A strip on the floor is the anchor of every cable mess: it collects dust, gets kicked loose, and is where the tangle visibly starts. Mounting it to the underside eliminates the problem at the source.
Two no-drill options: heavy-duty adhesive mounting strips (the interlocking hook-and-loop style) for lighter strips — clean both surfaces with alcohol, spread the load across enough strips, and let them cure before plugging in heavy adapters. Clamp-on brackets grip the desk edge or a tray and physically hold the strip — the safe pick for heavier strips with big wall-wart adapters.
Mount the strip near the back edge, outlets facing outward or downward so you can reach plugs without crawling under the desk, and keep it close to your cable tray so adapter bricks drop straight in instead of dangling.
Comparing the Five Methods
| Method | What it hides | Best for | Rough cost |
|---|---|---|---|
| Adhesive cable clips | Individual cable runs | Thin cables, finishing touches | ~$8–15 for a pack |
| No-drill cable tray | Power strip, bricks, slack | The biggest visual win | ~$20–40 |
| Cable sleeves / wraps | Bundled parallel runs | Multi-cable spines, vertical drops | ~$10–20 |
| Adhesive raceway | Desk-leg vertical drop | The finished, polished look | ~$12–25 |
| Under-desk strip mount | The power strip itself | Foundation of the whole system | ~$8–20 |
Prices shift frequently — treat ranges as approximate and check current listings.
For more ideas, see our roundup of desk cable management ideas — it covers additional approaches and accessories beyond the no-drill methods here.
Handling a Standing Desk’s Moving Cables
Standing desks add one complication: the desktop moves. Every cable connecting the desk to something stationary — power to the wall, Ethernet, a PC tower on the floor — has to survive up to a foot or more of travel, thousands of times.
The solution is a service loop: a deliberate U-shaped loop of slack that hangs below the desk and feeds out as the desk rises.
- Bundle everything on the desk first. Make all on-desk cabling one tidy unit that moves with the desk. Only power (and Ethernet, if you use it) should cross the moving boundary.
- Size the loop for the highest position. At maximum height, cables should be just barely taut — never pulling on connectors.
- Anchor the top, free the bottom. Clip the sleeve to the underside near the tray; the bottom hangs free. If you anchor both ends, something has to stretch — and cables don’t stretch.
- Keep it off the floor at the lowest position. The loop is longest when the desk is lowest; make sure it hangs behind the desk, not pooling where chair wheels will destroy it.
Never run a standing desk’s boundary cables through a fixed raceway that doesn’t move with the desk — it will rip off or yank connectors as the desk travels. The service loop is the one place where a little visible cable is the correct choice.

The Cable Drop From Desk to Wall Outlet
After the underside is clean, the last visible cable is usually the run from your desk down to the wall outlet:
- Outlet directly behind the desk: Run the power strip’s cord straight down inside an adhesive raceway on the desk leg, then a short hop along the baseboard to the outlet.
- Outlet to the side: Raceway down the nearest leg, then a flat adhesive cable cover along the baseboard. These sit nearly flush and practically disappear against the wall.
- Outlet across the room: Raceway or sleeve down the leg, then tuck the cable under a rug or use a floor cord cover to cross open floor. Never leave it lying across a walkway — it’s ugly and a trip hazard.
Whatever the layout, the principle is the same: one cable leaves the desk. Everything else terminates at the under-desk power strip and tray. One clean vertical line to the outlet is easy to hide; five diagonal ones are not.
Verdict: The Combo That Works for Most People
You don’t need all five methods — most clean no-drill setups use three, in this order:
- Mount the power strip under the desk (Method 5). Until the strip is off the floor, nothing else will look clean.
- Add a no-drill cable tray (Method 2) next to the strip for bricks and slack. These two steps hide most of the mess.
- Finish with clips and a sleeve (Methods 1 and 3) to turn remaining runs into tidy lines.
Add the raceway down the leg (Method 4) for the finished, photographed look — it’s the polish step.
Renters: all five methods are fully reversible — adhesive mounts come off with a hairdryer, and clamp-on accessories leave no marks.
Standing desk owners: build the service loop first and design everything else around it. It’s non-negotiable.
Glass desk owners: skip adhesive trays on the glass (mounts show through). Use clamp-on trays on the frame, clips along frame members, and lean on sleeves — one dark sleeve reads as intentional even against glass.
Frequently Asked Questions
Will adhesive mounts damage my desk when I remove them?
On finished surfaces like laminate, sealed wood, or metal — no. Heat from a hairdryer softens the adhesive so it peels off cleanly, and residue comes off with rubbing alcohol. On raw unfinished wood or delicate finishes, test in a hidden spot first.
How much weight can an adhesive cable tray hold?
Expect a power strip plus a few cable coils and small adapters — a few pounds total. For a heavy dock, laptop brick, and USB hub all at once, a clamp-on tray is safer. When in doubt, distribute weight: heaviest items in the tray, lighter accessories mounted separately.
Can I do this on a glass desk?
Yes, with adjustments. Avoid adhesive mounts directly on the glass — they’re visible from above. Use clamp-on trays on the metal frame, clips along frame members, and one or two dark sleeves for everything else.
Won’t cables pull out when my standing desk moves?
Not with a proper service loop. Only power and truly stationary connections cross the moving boundary, the loop needs enough slack for the desk’s highest position, and the top is anchored while the bottom hangs free.
Is it safe to bundle lots of cables together under a desk?
For typical home-office loads — monitors, chargers, a lamp, a dock — yes. Just don’t bury a high-wattage brick inside a sealed sleeve with no airflow; give big bricks breathing room in an open tray.
Conclusion
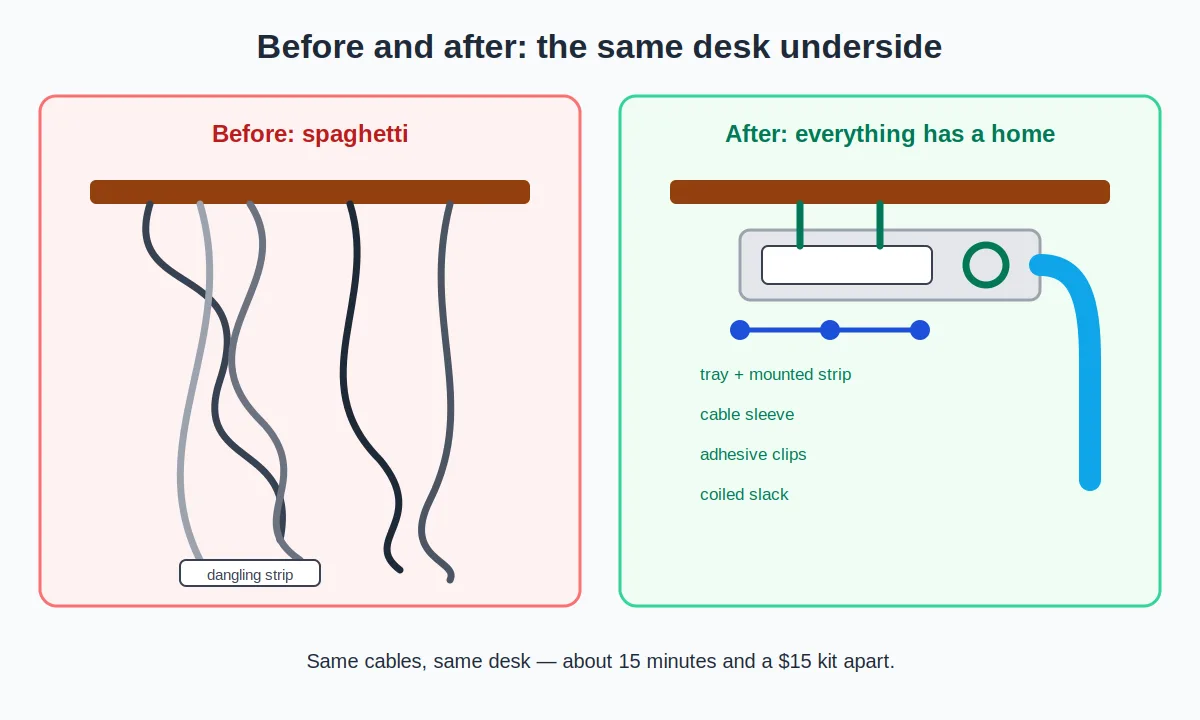
Hiding cables without drilling comes down to a simple system: get the power strip off the floor, give the bulky stuff a tray, bundle the runs into sleeves, and finish the vertical drop with a raceway. No screws, no damage, no landlord conversations.
Start with the power strip mount this weekend. It’s a fifteen-minute job that transforms the underside of your desk — and once you see the difference, the rest practically installs itself.