
How to Set Up an Ergonomic Desk (2026 Step-by-Step Guide)
An ergonomic desk setup puts your screen at eye level, your elbows at about 90 degrees, and your feet flat on the floor. Start with the chair, then set the desk height to match, then place the monitor an arm’s length away. The whole process takes about 30 minutes and needs no tools beyond a tape measure.
TL;DR — Ergonomic desk setup at a glance
- Chair first: seat height so feet rest flat and knees sit at about 90 degrees.
- Desk height: elbows at about 90 degrees, shoulders relaxed — roughly 28–30 inches for most adults.
- Monitor: top third of the screen at eye level, 20–26 inches away, tilted back 10–20 degrees.
- Keyboard and mouse: same surface, close to your body, wrists straight and floating.
- Movement: stand or walk for 5–10 minutes every hour — no setup replaces moving.
Method: we compared published specs, November 2026 street prices, and verified owner feedback for the gear named below.
What measurements matter most in an ergonomic desk setup?
| Measurement | Target | How to check it |
|---|---|---|
| Monitor distance | 20–26 inches (50–66 cm) from your eyes | Stretch your arm out — fingertips should just touch the screen |
| Monitor height | Top third of the screen at eye level | Eyes meet the upper part of the screen looking straight ahead |
| Monitor tilt | Top tilted back 10–20 degrees | The screen faces your eyes, not the ceiling or your chest |
| Elbow angle | About 90 degrees, shoulders relaxed | Upper arms hang straight down, forearms level with the desk |
| Knee angle | About 90 degrees, thighs level | Feet flat on the floor, knees at hip height or slightly below |
| Desk height (fixed) | About 28–30 inches for most adults | Keyboard home row sits at elbow height when seated |
| Standing desk height | Elbow height while standing, about 38–46 inches | Same 90-degree elbow rule, measured standing up |
These seven numbers are the whole setup — every step below adjusts one of them.
Step 1: How high should your chair be?
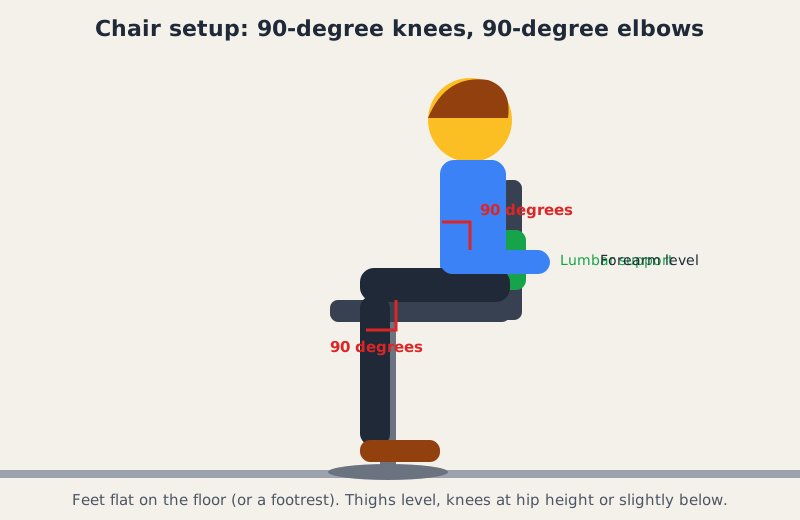
Set your chair height first, because everything else is measured from where you sit. Sit back so your lower back touches the backrest, then raise or lower the seat until your feet rest flat on the floor and your thighs are roughly level. Your knees should sit at about 90 degrees, at hip height or slightly below. If your feet dangle, add a $25–$35 footrest.
Adjust the lumbar support next. It should press gently into the curve of your lower back, not into your shoulder blades. On chairs with adjustable lumbar depth, such as the Branch Ergonomic Chair ($359 as of November 2026), slide it until the support meets your spine without pushing you forward.
Set the armrests last. They should support your forearms with your shoulders relaxed — not shrugged up, not hanging. If the armrests push your elbows out or lift your shoulders, lower them or remove them.
Step 2: What is the correct desk height for you?
The correct desk height is the one that puts your keyboard at elbow height while you sit with relaxed shoulders. For most adults that is a keyboard surface of about 28–30 inches from the floor. A standard 29-inch desk is too high for anyone under about 5 feet 6 inches.
If your desk is too high, your shoulders creep up toward your ears within an hour. If it is too low, you hunch forward to reach the keyboard. A keyboard tray mounted under the desk drops the keyboard 3–4 inches and costs about $40–$90, while an adjustable-height desk removes the problem entirely.
A standing desk solves the height question for every body size because you set the exact number. The FlexiSpot E7 starts at about $299.99 (as of November 2026) and adjusts from 22.8 to 48.4 inches. Measure your seated elbow height and set the desk to that number.
Step 3: Where should your monitor sit?
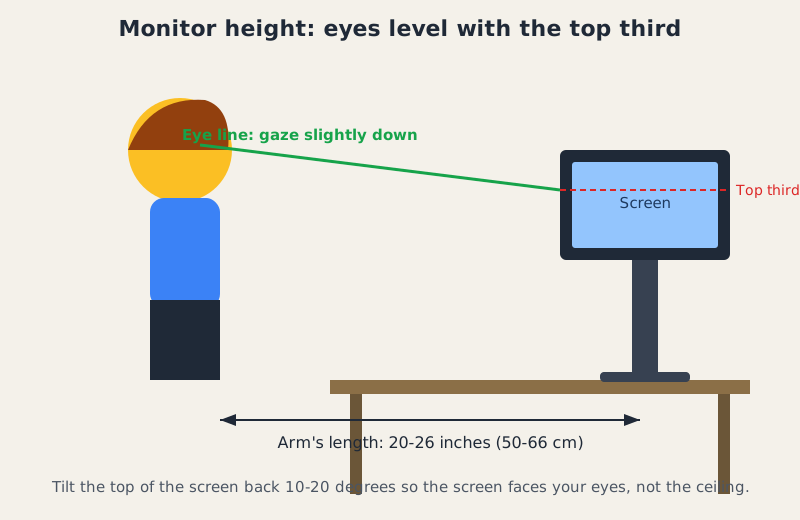
Your monitor should sit directly in front of you, an arm’s length away, with the top third of the screen at eye level. The distance rule is simple: stretch your arm toward the screen and your fingertips should just brush it, about 20–26 inches for most people.
OSHA’s Computer Workstations eTool recommends placing the monitor so the top of the screen is at or slightly below eye level, with the screen about an arm’s length away — the same targets in this guide. Tilt the screen back 10–20 degrees at the top so it faces your eyes squarely.
A monitor arm makes the height adjustment take seconds instead of a stack of books. The Amazon Basics single monitor arm runs about $99 (as of November 2026) and holds screens up to 32 inches; the Ergotron LX costs about $139–$199 and suits heavier 27–34-inch displays. See our best single monitor arm guide for the full comparison. A 27-inch 1440p monitor is the sweet spot for most desks, with solid options from near $200 (as of November 2026). Watch for glare too: turn the desk so windows sit to your side, not behind you or the screen.
Step 4: How should your keyboard and mouse be positioned?
Your keyboard and mouse belong on the same surface, close to your body, with your wrists straight and floating. Push the keyboard back until your forearms rest at about 90 degrees and your elbows stay close to your sides. The mouse sits right beside the keyboard at the same height — reaching across the desk for a mouse parked 12 inches away is one of the most common causes of shoulder ache.
Keep your wrists straight and in line with your forearms. OSHA’s workstation guidance advises keeping wrists straight, elbows close to the body, and the mouse at the same height as the keyboard and within easy reach.
Keep the keyboard flat, not propped up on its rear feet — the raised angle bends your wrists back. Laptop users: the next step matters most, because a laptop keyboard and screen can never both be at the right height at once.
Step 5: Can a laptop ever be part of an ergonomic desk setup?
Yes — but only with an external keyboard and mouse, and ideally an external monitor too. A laptop’s screen and keyboard are fixed together, so the screen is always too low when the keyboard is at the right height, and the keyboard is always too high when the screen is at the right height.
The minimum fix costs about $60–$100: a laptop stand that raises the screen to eye level (solid stands start near $25) plus a separate keyboard and mouse. The Logitech MX Master 3S mouse is $99.99 (as of November 2026), but any full-size keyboard and mouse you already own works.
The better fix adds a USB-C hub ($50–$100) and a 27-inch monitor (from near $200), bringing the full conversion to around $300–$400. If you work from a laptop with no accessories, a $25 stand and a $30 keyboard are the highest-value ergonomic purchases you can make.
Step 6: How do you arrange everything else on the desk?
Put the things you use most in the primary zone — the arc your forearms sweep without stretching — and everything else farther out. Your keyboard, mouse, phone, and notebook live in the primary zone. Reference papers, a water bottle, and the printer live in the secondary zone, at arm’s reach but not under your elbows.
Cable clutter is not just ugly; it shrinks your usable desk space and forces your mouse hand into a smaller area. A cable tray under the desk ($20–$40) and a few adhesive clips route power and display cables off the surface.
Lighting deserves the same attention. A desk lamp with adjustable brightness ($30–$60) aimed at your work surface, not at the screen, cuts eye strain on dark winter afternoons. The Mayo Clinic’s office ergonomics guide notes that poor lighting and screen glare contribute to eye strain, and recommends positioning your monitor to avoid glare and taking regular breaks to rest your eyes.
Step 7: How do you set up a standing desk ergonomically?
A standing desk uses the same rules as a sitting desk, measured standing up — elbows at 90 degrees, screen at eye level, feet flat. Stand upright, let your arms hang, and set the desk so the keyboard sits at your standing elbow height. For most adults that is about 38–46 inches from the floor. Then raise the monitor to eye level again — the screen needs to move up with the desk, which is why a monitor arm earns its keep on a standing desk.
Do not stand all day. The pattern that works is alternating: sit for 30–60 minutes, then stand for 15–30 minutes, and repeat. An anti-fatigue mat ($30–$60 as of November 2026) makes standing periods noticeably more comfortable. If your feet, knees, or back hurt while standing, sit down — pain is the signal to change position, not to push through.
Save the two heights as memory presets if your desk has them. Our standing desk setup guide covers sit-stand schedules and preset routines in detail.
Step 8: When should you buy ergonomic desk gear, and what does it cost?
Buy the chair first, the monitor arm second, and the desk last — and time the big purchases for sale weeks. A good chair changes your posture more than any other single purchase. A decent ergonomic chair starts around $229 (IKEA Markus) and runs to $359 (Branch Ergonomic Chair) or $1,445 for a Herman Miller Aeron (as of November 2026).
A full ergonomic overhaul has a wide price range. The budget version — footrest, laptop stand, keyboard, mouse, and a monitor riser — lands around $150–$250. The full version with a standing desk and a quality chair runs $800–$1,500.
Timing matters at the top end. Black Friday week (Nov 27–30) is when desk and chair prices hit their yearly floor — standing desks that list at $549 have dropped by $100–$150 in past sale events, and premium chairs see similar cuts. Our Black Friday home office deals guide tracks the discount bands to expect across desks, chairs, and monitors.
Step 9: How do you know your setup is working?
Give any new setup two full weeks, then judge it by how you feel at 5 p.m., not by how it looks at 9 a.m. The first three to seven days feel strange — your body has spent years adapting to the old arrangement, and the new one uses different muscles. Soreness that fades by the second week is adaptation. Pain that gets worse, or numbness and tingling in your hands, is a different signal: see a clinician rather than shopping for another accessory.
After two weeks, check: feet flat, knees at 90 degrees, shoulders relaxed, neck neutral at day’s end. If one answer is no, re-check that measurement — usually monitor height or desk height, the two numbers people set once and forget.
One honest limit: no desk setup treats or prevents medical conditions. The Mayo Clinic notes that ergonomics can reduce discomfort and strain, but persistent back or neck pain, numbness, or weakness deserves a clinician’s assessment, not a new chair. For the posture habits that support the setup, see our guide to improving posture at your desk.
Frequently asked questions
What is the best ergonomic desk setup for a small space?
A monitor arm and a compact 48-inch standing desk, with a chair that tucks fully underneath. The arm frees the desk surface, and the standing desk adjusts to any body size.
How high should my desk be if I am 5 feet 4 inches tall?
About 25–26 inches for the keyboard surface, measured to your seated elbow height. Use a keyboard tray or an adjustable desk to reach the right number.
Is a standing desk better than a sitting desk?
Neither — alternating is better than either alone. Sit 30–60 minutes, stand 15–30, and repeat through the day.
Do I need an ergonomic chair, or will any office chair work?
Any chair works if it adjusts to your body: seat height, lumbar support, and armrests that fit. A $229 chair that fits beats a $1,400 chair that does not.
How far should my monitor be from my eyes?
About 20–26 inches, or one arm’s length.
The bottom line
Set the chair first, the desk second, and the monitor third — then move every hour. An ergonomic desk setup is seven measurements, not a shopping list: feet flat, knees at 90 degrees, elbows at 90 degrees, screen at eye level and an arm’s length away. The budget version costs about $150–$250 and fixes most of the strain. Let how you feel at 5 p.m. be the judge.